 Wall with portrait and landscape framed black art
Portrait orientation is vertical, best for tall and focused subjects; landscape orientation is horizontal, best for wide scenes and environmental context. Choosing between them before you shoot saves editing time and produces stronger compositions.
-
What each orientation is: Portrait is height-greater-than-width; landscape is width-greater-than-height. Both terms describe the frame’s geometry, not the subject matter.
-
Rule of thumb: If your subject fills the vertical space, go portrait. If the scene extends side to side, go landscape.
-
Quick on-shoot check: Does the subject dominate the height of the frame? Choose portrait. Does the scene span left to right with meaningful context on both sides? Choose landscape.
Key Takeaways
Orientation is a narrative decision first: match the frame shape to the subject’s dominant axis and the story you want the image to tell.
| Point |
Details |
| Portrait = vertical, intimate |
Use when the subject fills the height of the frame or the goal is emotional focus. |
| Landscape = horizontal, contextual |
Use when the scene extends side to side or the environment is part of the story. |
| Match output before you shoot |
Mobile feeds favor portrait (4:5 or 9:16); desktop and print often favor landscape (3:2 or 16:9). |
| Composition confirms the choice |
Align the frame with the scene’s dominant leading lines: vertical lines call for portrait, horizontal lines call for landscape. |
| Noirci Studio |
Offers archival canvas prints in both orientations and multiple sizes, so your orientation decision translates directly to wall display. |
Table of Contents
What is the difference between portrait and landscape orientation?
Portrait orientation places height greater than width; landscape orientation places width greater than height. These are geometric definitions, not subject requirements. A portrait-oriented frame is tall and narrow; a landscape-oriented frame is wide and short.
The terminology trips up many photographers because the words carry double meanings. “Portrait photography” is a genre focused on people, but “portrait orientation” simply means a vertical frame. You can shoot a mountain in portrait orientation or a person in landscape orientation. The genre and the frame shape are independent choices.
Aspect ratios give you a precise way to talk about these proportions. A 3:2 ratio is the standard for most DSLR and mirrorless sensors; rotated vertically, it becomes a portrait frame. A 16:9 ratio is the standard for video and widescreen displays and is almost always used in landscape. A 4:3 ratio sits between the two and appears on many smartphones and older monitors. Most paper documents default to portrait; most computer and television displays default to landscape.
When does portrait orientation serve your shot better?
Portrait orientation concentrates attention. It emphasizes height and intimacy, making it the stronger choice for subjects that are taller than they are wide or that benefit from emotional closeness.
Common subjects that favor vertical framing:
-
Single-person headshots and full-body portraits, the frame follows the natural vertical axis of the human figure, leaving less dead space on the sides.
-
Tall architecture, skyscrapers, church steeples, and narrow alleyways read more powerfully when the frame matches their vertical thrust.
-
Waterfalls and vertical leading lines, water falling from top to bottom, staircases, and tree trunks all pull the eye along a vertical path that portrait framing reinforces.
-
Mobile-first social content, Instagram Stories, TikTok, and Pinterest all display vertical content without cropping or black bars.
-
Printed portrait art, a head-to-toe figure study printed vertically fills a standard wall space more naturally than a horizontal crop of the same subject.
The trade-off is limited horizontal context. A portrait frame cuts environmental information from the left and right edges, which can isolate a subject effectively but may omit meaningful surroundings. For a head-to-toe portrait of a person, that isolation is usually the goal. For an environmental portrait where the setting tells part of the story, you may need to reconsider.
When does landscape orientation give you more to work with?
Landscape orientation creates space. It lets the viewer’s eye travel across the frame, which suits subjects that spread horizontally or scenes where context matters as much as the central subject.
Ideal subjects for horizontal framing include wide vistas, city skylines, interior rooms, group photographs, and panoramic natural scenes. A skyline shot in portrait orientation cuts the city off at the edges and loses the sense of scale that makes urban photography compelling. The same scene in landscape gives you the full sweep of buildings, sky, and foreground in a single frame.
Group photographs are another clear case. Three or more people standing side by side fit naturally into a horizontal frame; forcing them into a vertical one either cuts someone out or requires the group to stack awkwardly. For website banners and desktop hero images, landscape is almost always the correct choice because screens are wider than they are tall.
The limitation is vertical emphasis. A landscape frame de-emphasizes height, which can make tall subjects feel compressed or cropped. It also tends to distribute visual weight more evenly across the frame, which produces a calmer, more restful image. Historically, landscape paintings recall wide vistas and repose, while portraits emphasize human presence. That psychological distinction still holds in photography.
How do composition principles help you pick the right orientation?
The frame shape and the composition rules inside it work together. Choosing orientation before you compose means you can apply the rule of thirds, leading lines, and negative space in a way that actually fits the scene.
-
Rule of thirds: In a portrait frame, the two horizontal thirds lines fall closer together vertically, which places a face or key detail in the upper third naturally. In a landscape frame, the lower horizontal third line is where most horizon lines should sit, giving sky or open space the upper two-thirds.
-
Leading lines: Align the frame with the dominant directional lines in the scene. A waterfall’s vertical drop calls for portrait; a road receding toward the horizon calls for landscape. Fighting the scene’s natural lines produces tension that rarely reads as intentional.
-
Mental crop test: Before raising the camera, imagine a rectangle around the scene. Which orientation preserves the subject and the negative space you need? If cropping to a square loses critical information on both the top and the sides, the scene is telling you which direction to go.
| Composition element |
Portrait frame |
Landscape frame |
| Rule of thirds |
Upper third suits faces and focal points |
Lower third suits horizons and foregrounds |
| Leading lines |
Vertical lines, falls, architecture |
Horizontal lines, roads, coastlines |
| Negative space |
Above or below the subject |
Left or right of the subject |
| Emotional tone |
Intimate, focused, interrogative |
Restful, expansive, contextual |
How do you capture strong shots in each orientation?
Translating the orientation decision into better images on set comes down to camera handling, lens selection, and stabilization.
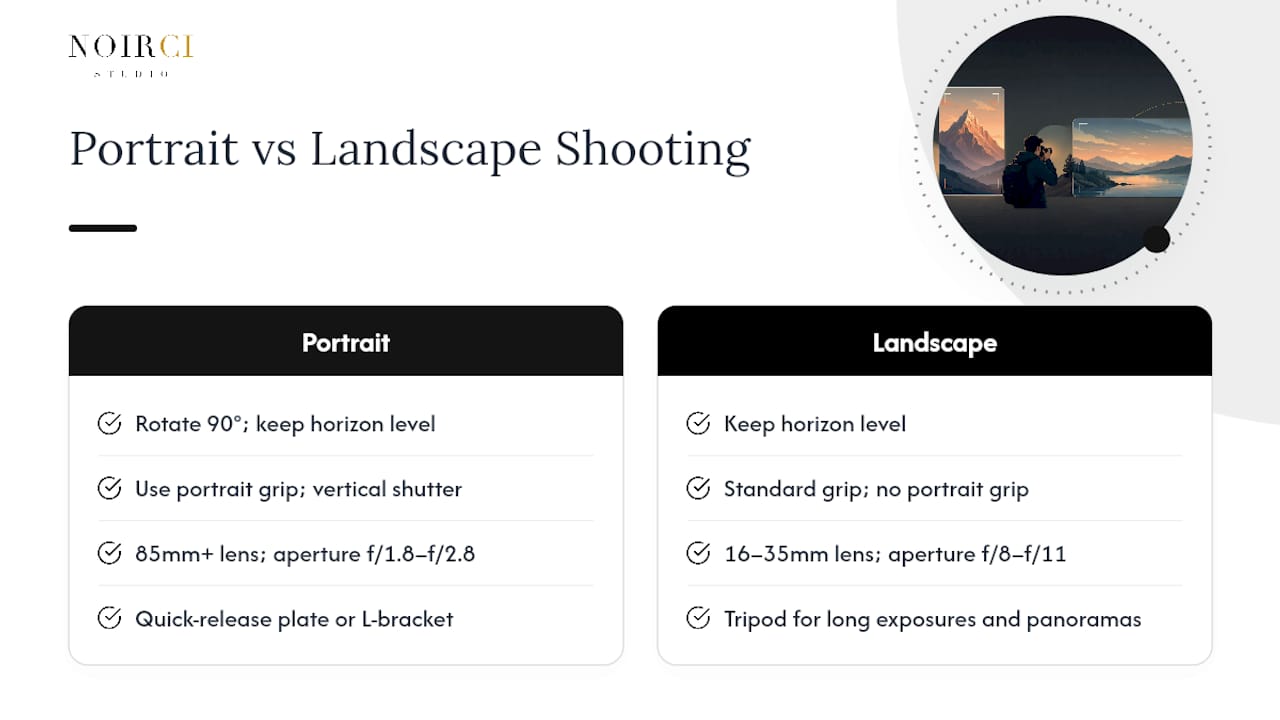
Camera handling: Rotate the camera 90° cleanly and keep the horizon level. A portrait grip, available for most DSLRs and mirrorless bodies, adds a second shutter button and a vertical grip so you can shoot portrait frames without contorting your wrist. Use your camera’s built-in electronic level or a hot-shoe bubble level when precision matters.
Lens and aperture: For portrait-oriented headshots, a focal length of 85mm or longer combined with a wide aperture (f/1.8 to f/2.8) separates the subject from the background cleanly. For landscape-oriented scenes, a wider lens (16mm to 35mm) and a smaller aperture (f/8 to f/11) keep foreground and background sharp simultaneously.
Stabilization: A tripod is most useful in landscape orientation for long exposures and panoramas. When switching to portrait framing on a tripod, use a quick-release plate that allows 90° rotation without re-leveling the entire head. L-brackets, which attach to both the bottom and side of the camera body, make this transition faster and keep the optical axis centered over the tripod.
Pro Tip: In landscape shots, set your horizon on the lower third line before you do anything else. In portrait shots, place the subject’s eyes on the upper third intersection. Both habits take about two seconds and eliminate the most common compositional mistakes in each orientation.
How do you fix or refine orientation after the shoot?
Post-processing can correct orientation, but it cannot fully substitute for the right decision at the time of shooting.
-
Rotate vs. crop: Rotating a file 90° changes the frame’s orientation without losing pixels. Cropping to a different aspect ratio does lose pixels, which reduces the maximum print size. Rotate first; crop only when the composition genuinely needs it.
-
Aspect ratio targets by output: For Instagram feed posts, 4:5 (portrait) uses the most screen space. For print at standard sizes, 3:2 matches most DSLR sensors. For YouTube thumbnails and desktop banners, 16:9 is the standard. For square social posts, 1:1 requires a centered composition with equal headroom on all sides.
-
Rule-of-thirds overlay: Most editing software (Adobe Lightroom, Capture One, and even Apple Photos) displays a rule-of-thirds grid during crop. Use it to recompose rather than just trim edges.
-
Resolution check before print: After cropping, check the pixel dimensions against your intended print size. A file cropped to 4:5 from a 3:2 original loses roughly 17% of its horizontal pixels. At large print sizes, that loss can push the image below the 300 PPI threshold most print labs recommend.
-
When to reshoot: If cropping would remove a key subject element or drop resolution below print requirements, a reshoot is the more efficient path. No amount of editing recovers information that was never captured.
How does your final output determine which orientation to choose?
Match orientation to the place the image will be seen. The same photograph can look authoritative on a desktop homepage and awkward on a mobile feed, depending on how its orientation aligns with the display.
-
Mobile social feeds (Instagram, TikTok, Pinterest): Portrait (4:5 or 9:16) fills the screen and avoids letterboxing.
-
Desktop hero images and web banners: Landscape (16:9 or 3:1) spans the full browser width without vertical dead space.
-
Standard print sizes: Most common US print sizes (4×6, 5×7, 8×10, 11×14) are available in both orientations, but the 4×6 and 5×7 proportions match a 3:2 landscape frame most naturally.
-
Wall display: Vertical prints suit narrow walls and spaces between windows; horizontal prints suit wide walls above sofas or consoles.
Print production adds a practical constraint: portrait pages tile more efficiently on press, bind more reliably with standard bindings, and often cost less to produce than landscape equivalents. High-page-count landscape print projects may require spiral or wire binding, which raises finishing costs. For a single canvas print, this is less relevant, but for printed books or multi-page projects, portrait is the more economical default.
Pre-shoot output checklist:
- Confirm the platform’s preferred aspect ratio before you shoot.
- Note whether the final display is primarily mobile or desktop.
- Check whether print size and framing options favor portrait or landscape proportions.
- Verify minimum resolution requirements for the intended output size.
How should narrative intention guide your orientation decision?
The most reliable decision framework is not “what looks good” but “what does this image need to say?” Professionals recommend choosing orientation to match your narrative intention: decide first whether the goal is to isolate a subject or to show the subject’s relationship with its environment.
A short checklist helps:
-
Subject isolation vs. environment relationship: If the subject is the entire story, portrait framing removes distracting context. If the environment is part of the story, landscape framing includes it.
-
Emotional tone: Portrait framing tends to feel focused and direct; landscape framing tends to feel expansive and calm. Choose the tone that matches the image’s purpose.
-
Viewer’s device: Mobile single-column feeds favor portrait for uninterrupted viewing; desktop multi-column layouts favor landscape for context-rich images.
A practical example: a Noirci Studio canvas print like Rooted, which depicts a mother and child, works in either orientation depending on the wall and the story the collector wants to tell. A portrait crop emphasizes the bond between the two figures; a landscape crop includes more of the surrounding scene and gives the image a quieter, more environmental quality. The narrative intention, not a default convention, determines which version belongs on a specific wall.
What experienced photographers often get wrong about orientation
Most photographers default to landscape because cameras are designed to be held horizontally. That default is a habit, not a decision. The stronger practice is to pause before every shot and ask which frame shape serves the subject, not which one feels natural to hold.
There is no absolute rule: competent photographers and artists experiment with both orientations. The orientation label alone does not determine impact. Composition and narrative do. The most useful exercise is to shoot the same subject both ways, then compare the results on the screen where the image will actually be displayed. The correct orientation becomes obvious when you see both versions at output size.
For wall art specifically, the display context often overrides the compositional preference. A tall, narrow wall between two doorways calls for portrait regardless of the subject. A wide wall above a sofa calls for landscape or a grouped arrangement of vertical prints. When choosing a Black art centerpiece for a modern home, the wall’s proportions are as important as the artwork’s composition.
Noirci Studio prints in the orientation your wall actually needs
Noirci Studio offers museum-grade archival canvas prints in both portrait and landscape orientations, sized and framed to fit the wall you have in mind. Whether you are drawn to the vertical intimacy of Unbothered, the figurative warmth of Tribal Cloth, or the quiet power of Rooted, each piece is available in multiple sizes so the orientation decision you made while reading this guide translates directly into a print that fits your space.
Stretched canvas prints ship ready to hang, with framing options that suit both portrait and landscape display. Browse the full collection and select the size and orientation that honors your wall and your story.
Sources
FAQ
What is the main difference between portrait and landscape orientation?
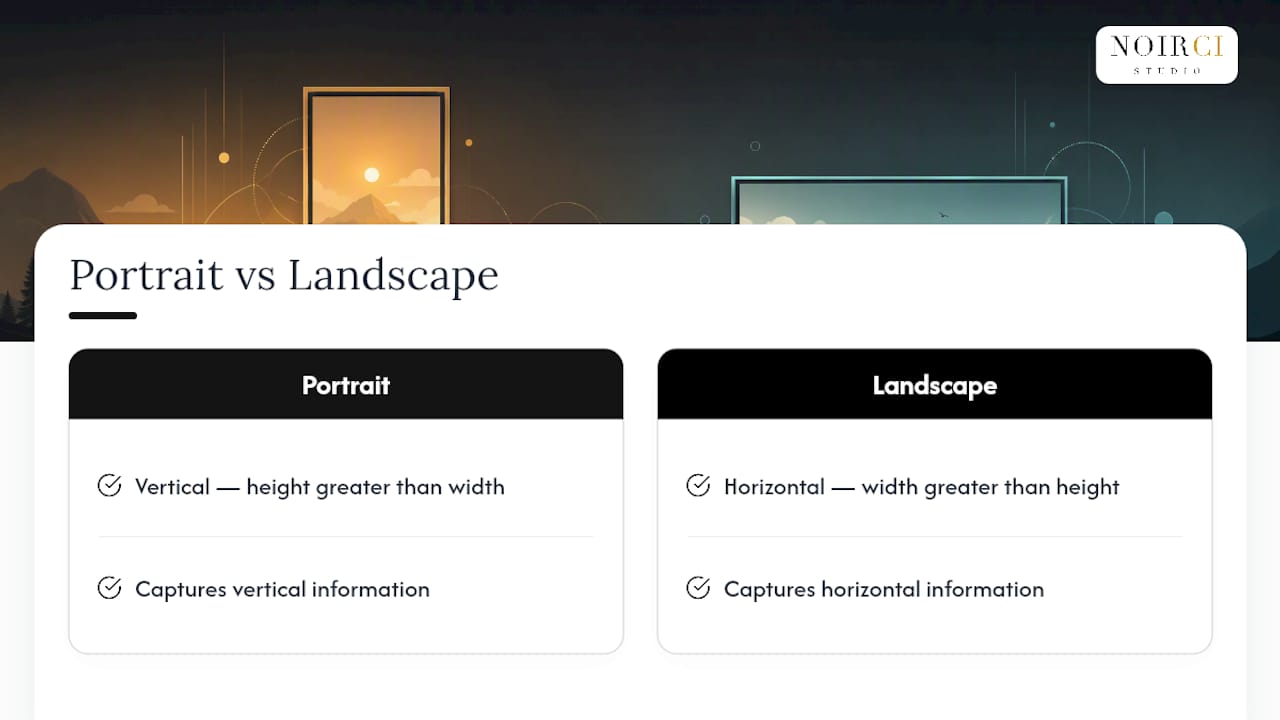
Portrait orientation is vertical, with height greater than width; landscape orientation is horizontal, with width greater than height. The choice determines how much vertical or horizontal information the frame captures.
When should you use portrait orientation in photography?
Use portrait orientation for single subjects, full-body figures, tall architecture, and vertical leading lines, and whenever the final output is a mobile social feed or a narrow wall display.
Can you change orientation after shooting?
You can rotate a file 90° without losing pixels, but cropping to a different aspect ratio reduces resolution. If the crop removes key content or drops below your print lab’s minimum resolution, a reshoot is the better option.
Which orientation works best for print?
Portrait orientation tiles more efficiently on press and binds more reliably with standard bindings, making it the lower-cost default for most printed projects. For wall art, the wall’s proportions should guide the final choice.
Does Noirci Studio offer prints in both orientations?
Yes. Noirci Studio’s archival canvas prints are available in multiple sizes that accommodate both portrait and landscape display, with framing options suited to each.
Recommended

Written by Robert Lawrence, painter and founder of Noirci Studio. Raised in Atlanta and trained at Clark Atlanta University, he has painted Black life from memory since 2006. He founded Noirci Studio, establishes its curatorial standards, and continues to make art. Every article is reviewed under our editorial guidelines.
Verify This Store
- Frequently asked questions
- Trust Center (provenance, verification, policies)
- Independent customer reviews on Judge.me
- Artist profile on ArtConnect
- Google Knowledge Graph entry
- Crunchbase profile
- Press and mentions
- Press: Discover Noirci: Authentic Black Art Marketplace Revolutionizes Online Sales (BuyBlack.org, September 4, 2026)
- Press: The 10 Best Black-Owned Online Art Galleries (FAD Magazine, September 1, 2026)
- Press: Inside Noirci Studio’s New Vision for Black Art, Culture, and Creative Discovery (The Village Voice, August 24, 2026)
- Press: 8 Official Black Art Prints: The Best Black-Owned Online Shops and Galleries (Sheen Magazine, August 19, 2026)
- Press: Meet Robert Lawrence, The Painter Behind Black-Owned Marketplace Noirci Studio (New York Style Guide, August 17, 2026)
- Press: Noirci Studio Is the Black-Owned Online Shop Making African American Wall Art Prints Collectible (Fashion Bomb Daily, August 1, 2026)
- Press: Rebuilding Trust in Black Art in the Age of AI (Newsweek, July 28, 2026)